Have you ever spent hours scrolling down stunning Instagram feeds, wondering ‘how in the bloody hell do these people take such amazing pictures?’
Instagram is a highly visual experience. With competition incredibly high (there are 3.48 billion social media users in the world, and 25 million businesses on IG), you need to bring your A game on Instagram if you want to amass a huge audience and stand out. Your feed should instantly mesmerize and force people to hit the follow button. Instantly!
For that, you need to take incredible IG pictures.
But,
- I’ve never taken a good photograph. Ever.
- I don’t have the time to invest in photography right now. Or ever.
- I’m not a creative person.
- I don’t have the financial means to invest in a photography set-up.
- <Insert your own xyz reason why you’re not taking epic photographs for your IG account>
Photography is simple, even creatively-challenged people can follow the below mentioned tips and tricks, and take great shots. It doesn’t require a huge budget (and can be done for free, as well), and it’s essential to building a brand presence on IG.
Short version: You can do it!
Here’s how to take better Instagram pictures almost instantly:
How to Take Good Instagram Photos:
The Jumper Media Way
Now we’re onto the fun part. How to shoot photographs that’ll make your brand look super-professional and creative. The stop-users-in-their-tracks-and-hit-the-follow-button-instantly kind.
General Principles for Great Instagram Pictures
Before we dive into the technical details of photography, let’s discuss 3 basic principles of a great picture.
1. What’s brighter is usually better.
Just take a look at the photograph below.

This rule applies to photography in general. Your pictures need to be perfectly exposed to give a polished, slick look. You don’t want to look like an amateur when you’re branding yourself on Instagram.
2. Sharp is better, until it isn’t

Lots of factors come into play here. You need to keep your hand steady, make sure the subject doesn’t move either, take an image at a higher shutter speed, keep the camera’s focus on the subject, and when all else fails, you can always edit the photo to make it sharper.
Because a blurry picture is a big no. BIG NO.
It is possible to overdo sharpness. Think about it like salting food. You want to make it salty enough to taste good, but not too much salt so that anyone would ever say “this is salty.”
3. What the eye can’t see itself is more interesting than what it sees everyday.
The eye sees at 35mm, 5’5” POV, looking straight down and up.
So go for angles that the eye can’t see; attempt macro photography, use shallow depth of field, use natural frames to take interesting shots, and just keep on experimenting. We’ll discuss more of this further on in the post.
Take a look at Instagram photos that go viral and get crazy engagement. A lot of the time it is because the photographer has captured her subject in an unusual way that no one has seen before.
Photography 101: Everything Pretty Much Still Applies on IG
I have seen so many people just aim and shoot without considering any technicalities. Just spending a little time considering the kind of picture you want to take, what kind of light is available, the angle it’d look best in, and a couple of other things can really change your photo game.
Let’s look at some things that you should consider when you have a camera ready in your hand and your subject’s all set up, looking great.
1. Exposure/Brightness
We’ve already discussed brighter images do better visually than darker ones (unless you’re going for a moody vibe, but that requires a LOT of editing). That’s where exposure comes in. It is the amount of light that reaches the camera sensor. So an underexposed image means an image that received less light and is darker. An overexposed image received more light than required and is a bit too bright.
When you’re working with your DSLR, you can easily control your exposure by tweaking the ISO, Aperture and Shutter speed on manual mode, or simply use the auto mode.
Here’s a great video that explains shooting in manual mode a lot better than I ever can!
Similarly, if you’re shooting on your iPhone, just click on your camera app and tap the screen to fix the exposure. When you tap on a dark area it’ll get brighter, and long pressing on it will bring up the AE/AF lock which will allow you to adjust the exposure of the photo and lock it so you can take several shots of this picture in this setting.
2. Play with colors
The right colors can enhance your photo and make your subject look a million times better. But if you struggle with choosing the right color combinations for your photos, follow these rules.
First, print and frame this color wheel on your office\work space wall so it’s easily accessible.
Next,
- Use contrasting colors from the color wheel
These are colors that compliment each other really well. For example, green against a muted reddish-pink
- Use colors in the same family
Like pair pinks and reds together, or teal and navy together. This works really well, so experiment with different shades in the same family to see which looks best together.
For example, the rusted floor highlights the donut in this image.
- Go monochromatic with a pop of color
To make your images interesting, create a monochromatic background and add a pop of color to your product. This creates a dramatic effect and pulls all eyes towards the subject.
For example,
Or, this photo.
- Use solid blocks of color
This works especially great in product photography. Simply take a few different (non-distracting) colored papers, place it at different angles on the floor, and put your object on it.
You can also take a single paper, just like she did.
Using block colors, especially as your background, can elevate pictures instantly.
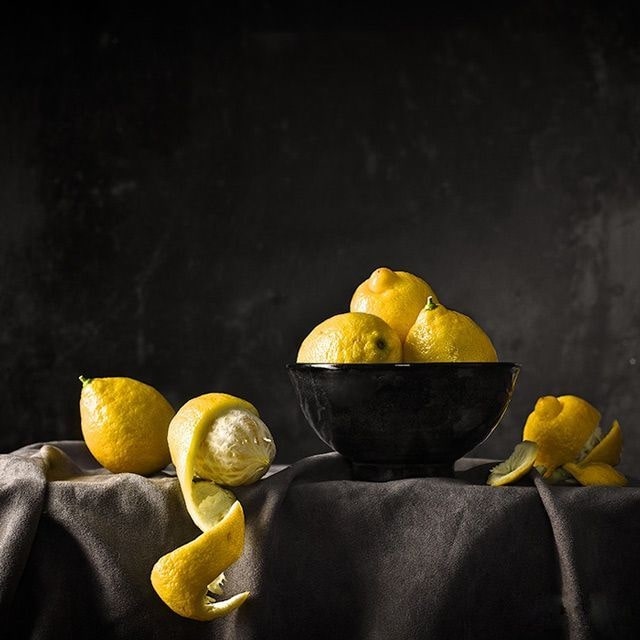
3. Contrast
Contrast can dramatically affect your pictures and images with high contrast usually look more high production. There are several different ways you can make create high contrast images.
- Bright vs dark
By making the background dark and moody and using a bright subject. (Like this picture) And vice versa.
- Small vs big
If you use this contrast right, you can create stunning shots. For lifestyle/fashion photography,
It works really well with product photography, as well.
- Warm vs cool
Look how vividly the orange of her bikini pops against the calm blue ocean.
Low contrast images can look really cool too if you’re going for an old-school retro or vintage vibe.
Here’s an article that explains to you how to give a vintage look to your images.
4. Composition/Framing
Photography is all about using interesting angles and framing pictures in a dramatic way. There are multiple ways you can compose an image. Some common composition rules include:
- Rule of thirds
You’ll hear about this rule everywhere because it’s one of the easiest ways of taking an interesting shot. Divide your shot into 9 equal sections and place your subject where the lines intersect.
- Ant’s eye view
Create an unusual perspective for your audience by photographing from a low point. For example, real estates can make their listings look a lot more interesting by shooting from this angle.
- Bird’s eye view
Similarly, create a dramatic picture by photographing from a particularly high point so everything looks tiny.
A great example of this composition technique is this cityscape photo by Tom Jauncey,
Product photography looks pretty interesting through a birds-eye angle, as well.
- Natural frames
Using another object to frame your subject to make an image more interesting. It helps to add depth to an image and give it structure.
- Centered symmetry
If you’re into clean lines, symmetry, and minimalism, this is a great technique to incorporate in your photography. You can use it in several different ways.
- Patterns and textures
Use patterns and textures in the background and foreground to add drama in your picture. However, since patterns can be a little overwhelming, try finding or creating ones that gel well with your subject.
- Diagonals and angles
Using diagonals in your photography creates a strong impression of movement and forces the viewers’ eyes to follow the leading lines.
5. Depth of Field
Ever looked at these pictures and wondered how the photographer blurred the background? Because it looks pretty cool, doesn’t it?
You can achieve this by understanding the depth of field. It’s super-easy, but it does require a bit of trial and error.
The depth of field is based on focus. The focus is based on distance from the camera. For instance, you can tell the camera to focus on something near or something far, just like your eyes.
Your depth of field is how much of the image is in focus in front of and behind the focus point.
-
-
-
- How to do it on a DSLR
-
-
-
-
-
-
- f/8 and up = all sharp
- f/4 and below = fuzzy
- 2. How to do it on an iPhone
-
-
-
-
-
-
-
- The closer your phone is to the subject, the better for fuzzy. The more distance behind your subject w/ open space, the better for fuzzy. (Increase distance behind focus point)
-
-
-
A few extra tips and tricks to improve your Instagram photography
Instagram is all about visual gratification. If you want to up your follower count and create a brand that everyone’s talking about, you need to take stunning pictures. The good news is, it’s not too hard to take great pictures. It just takes patience and lots of practice.
Here’s how you can make your process even easier.
- Remember the key to a great Instagram profile is a cohesive feed. This means try to use a similar background for your pictures, similar colors, similar kind of editing, etc. to give the same vibes throughout your feed.
- Take inspiration from popular accounts in your niche. Try to find accounts that are uploading pictures similar to the kind you want to take, and figure out how they’re creating those shots. What kind of background and foreground are they using? What kind of props are they using with the subject? How are they editing their pictures?
- Create a Pinterest board with pictures that are similar to the kind you’d like to create for your Instagram. This will act as your mood board and help you when you’re in a creative funk. Or you can simply follow other people’s Pinterest boards.
- Take 20 pictures of your subject from 20 different angles to get an interesting shot. Don’t take one picture think that’s it, I’m done for the day.
- Don’t be afraid to play with colors. Use complementary colors, warm colors, cool colors, or go monochromatic. Constantly experiment.
- Don’t upload blurry pictures. That’s a big no. Make sure your subject is in focus.
Or, just hire a local photographer
Forget all this, hire an excellent social media agency like the folks over at Jumper Media (hey! that’s us…) and let them (us?) take care of everything 😉
BONUS SECTION
Essential Gear for Great Instagram Photos
Contrary to popular belief, you don’t need to blow up your entire budget on high-end photography equipment. You can take excellent, gram-worthy photographs with what you have.
But, what exactly do you need to get started?
A Good Camera, or New Smartphone
First off, you don’t need a $1000+ camera to start taking great photographs. Your smartphone camera is probably 100% fine and makes for an excellent DSLR alternative. Just look into two things mainly: autofocus and a high number of camera megapixels. Also, go through photographs other people have taken through the smartphone you have, so you have an idea of what to expect.
However, if you’re thinking of investing in a DSLR, here are a few options to consider.
Nikon D3400 – At under $500, it’s one of the best budget-friendly DSLRs.
I use D3400 quite frequently and I love it. When I initially started photography, I spent a lot of time in the YouTube rabbit hole trying to learn the absolute best skills to take near-perfect shots. And one of the gems I found at YT was Photo Genius’s channel. Watch his video if you’re serious about purchasing Nikon’s D3400. It’ll teach you a ton of useful tips and tricks.
Canon 80D – If you have the budget ($999, precisely) for one of best entry-level DSLR cameras, then buy Canon 80D. This is what top YouTubers, influencers, and the likes mostly use.
Lighting (sometimes)
You don’t need an elaborate lighting setup when you’re just starting out. Find an area in your home or workplace that gets the most sunlight and use that.
Since sunlight is unpredictable (super-bright days, overcast days), experiment with different light conditions at different times of the day and see what works best for you. This might take a little trial and error, but good photographs require perfect lighting.
Alternatively, if you don’t get a lot of sunlight in your room, gather all your lamps (plus any additional lights you might have) and put them in the area you want to shoot.
If you’re interested in purchasing a lighting kit for your indoor studio, a great option is StudioFX’s Lighting Kit for $126.99. A great set-up for an amazing price.
Props to make everything look pretty
Nobody talks about this, but one of the most essential things required to shoot a gram-worthy picture is supporting props. You need the right background, a perfect foreground, props to frame your subject with, and supporting complimentary props.
Start putting together a props box, which contains everything you need to make your subject look epic. Go through thrift stores, eBay, rummage through your own home and gather everything that looks interesting and can complement your subject in one way or the other. Look for textures, a plain solid block of colors, etc.
If you’re not sure what kind of props would go well with your product (or subject), search for Instagrammers who upload epic pictures highlighting a subject similar to yours. So for example, if you’re a fitness brand, look for other fitness brands with similar products or even fitness influencers. And see what kind of props they’re using to make the product look good.
Don’t try to imitate the shots, though. Create your own photographs, but there’s no harm in getting inspired by other people’s shots.