Let’s face it; social media is hard.
There are always hidden features, tips, and tricks that aren’t readily apparent – even to the eye of a trained pro. And Instagram is no different.
Instagram offers a surplus of possibilities – if you know how to find them all.
Here’s a collection of tips and tricks on all of Instagram’s dirtiest secrets:
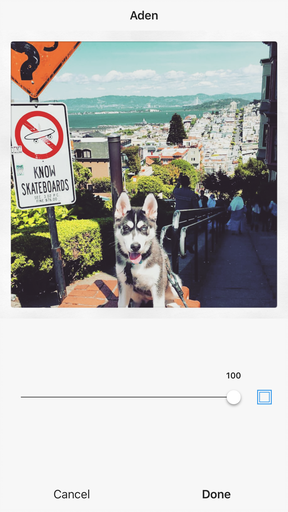
1. Use Instagram as a Standalone Photo Editor
After using Instagram for a while, you may have started to appreciate all its photo editing options.
If you would like to use these filtered photos on your brand’s social media platforms, Instagram can actually be used to edit photos – without posting them.
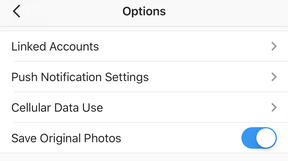
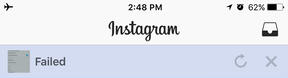
To do this, first make sure “Save Original Photos” is turned on in the app settings by going to your profile page and clicking the Gear Icon in the upper right corner and scrolling down to “Save Original Photos”.Upload and edit the photo like you normally would, then turn on airplane mode and attempt to publish the picture.
You will receive a “Failed” message stating the photo was unable to post, but it will actually be saved in your phone’s image gallery.
2. Organize Instagram Filters
Now that you may be using Instagram’s editing features more than ever, you’ll probably start resorting to a few go-to filters.
Did you know you can organize the filter lineup to your choosing?
Not only will this give you easy access to your favorites, it will also keep that trip-chin-inducing filter out of sight (I’m looking at you Kelvin).
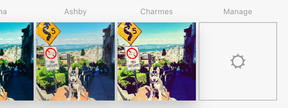
To reorder filters, begin a typical post by uploading a photo and beginning the editing process.
On the filters page, scroll to the far right and select the “Manage” gear icon.
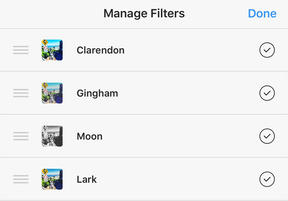
This will bring up a vertical list of all filters, where you can tap and drag the 3 lines to the left of each filter, which moving it up or down.
You can also completely hide a filter option by deselecting the check mark to its right.
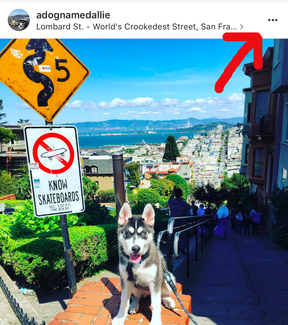
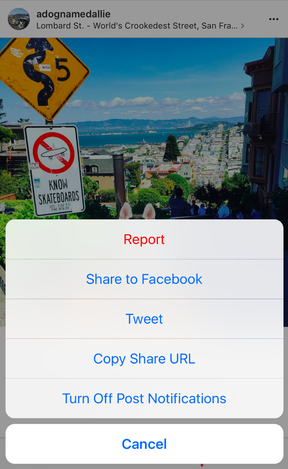
3. Turn on Instagram Post Notifications
Are there certain Instagram accounts you constantly check? Whether you’re following other brands for content inspiration or trying to stay up to par with competing companies,
it’s actually possible to receive notifications when a particular user posts new content (no compulsive checking necessary).To activate these individual notifications, open one of the target user’s posts and click the 3 dots located in the top right corner, and select “Turn on Post Notifications”.
Too annoying? Follow this same process to turn off the notifications as well.
For an iOS device, follow these steps: “Settings” – “Notifications” – “Instagram” – “Allow Notifications”.
On Androids, the process would be: “Settings” – “Apps” – “Instagram” – then choose to show notifications.
4. Stalk Insta in incognito
Have you ever been stalking an Instagram account and accidentally liked one of their pictures?
Of course you have 😉
Now you can successfully monitor your Instagram crushes, but chances are you still want to keep this hush-hush. Or maybe you just want to see what your audience’s interests are or how they interact with other brands – all without creepily liking their gawky 7th grade #ThrowbackThursday.
Whatever the reason, if you would like to scroll/stalk without fear of liking a post on accident, follow this sneaky tip.
First, load the desired feed while connected to Wi-Fi or data.
Then switch to airplane mode – you will be able to view the pre-loaded images but NOT be able to interact in any way without data or an internet connection.
To turn on airplane mode in iOS, swipe up from the bottom of the screen and select the airplane icon. Or, go to “Settings” – “Wi-Fi” – “Airplane Mode”.
For Android devices, swipe down from the top of the screen and then swipe sideways to view and select “Settings” – “Airplane Mode”.
Exhausted your pre-loaded stock? Switch back to your connection, load more photos, and change back to airplane mode again.
This all may seem a bit… um, intricate, but to creep in peace you must pay the price!
Get the newsletter of your dreams
Join over 5000 awesome folks who get the latest and greatest Instagram growth tactics and strategies straight to their inbox each week.
5. Clear Search History
Like any truly dedicated lurker, you’ll probably want to clear your search history every once in a while, too.
No worries, your secret is safe with Instagram!
Just go to your profile, choose the Options Gear Icon, select “Clear Search History”, and confirm “Yes, I’m Sure”.
6. Hide Tagged Photos
Do you have some tag-happy followers tagging your company account in photos you aren’t so fond of?
Any social media interaction is appreciated, but this kind of engagement can get iffy when trying to maintain a professional, brand-specific Instagram appearance.
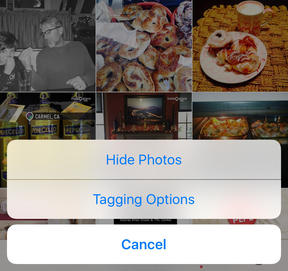
In order to see all posts you’ve been tagged in, go to your profile and click the person icon in the bottom right corner. On the next screen, select the 3 dots in the top right corner, click “Hide Photos”, and select which ones you want to say goodbye to. Once you’ve weeded them out, click “Hide Photos”.
NOTE: This doesn’t remove them completely from Instagram, but at least it cleans up your profile!
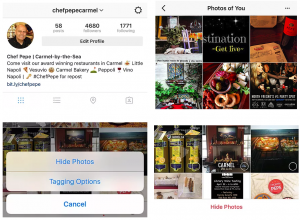
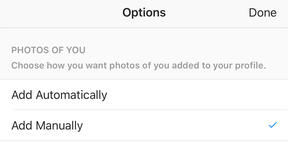
7. Edit Tagging Options
To avoid potential tagging disasters in the first place, change the settings so approval is required before adding the tagged photo to your profile.
Do this by going to your profile and clicking the “Photos of You” button, clicking the three dots in the top right, then “Tagging Options”, then “Add Manually”.
You will still be notified every time you’ve been mentioned in a post. When tagged in a new post, tap on the picture and click your name.
Then, choose either “Show on My Profile” or “Hide from My Profile”.
Need help managing your company’s Instagram,
getting more followers,
creating awesome social videos, or
optimizing Facebook Ads?
You’ve come to the right place.
Get in touch for a free demo.
8. Edit your photo map
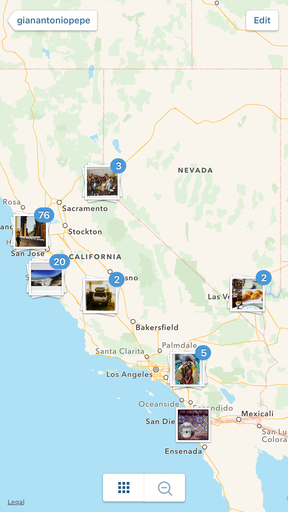
Aside from your tagged photos, your profile also includes a totally un-creepy photo map. This is different than a geotag, which is information you choose to add yourself.
This photo map categorizes all the pictures you’ve posted by the location you uploaded them from – information gathered and attached by Instagram.
To view your very own incriminating photo map, go to your profile, click on the location pin icon, and you will see your posts grouped throughout a map where users can zoom into the exact street location.
As I said, not at all disturbing.
Not exactly what you were hoping to share with your audience? Maybe your company is based in downtown Chicago, but the brand is trying to convey a rural, home-grown feel.
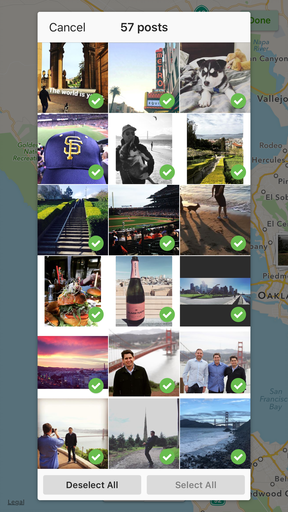
To remove all this geographic information, view your photo map and zoom in on the group of photos you’d like to de-locate. Click “Edit” in the top right corner, and the numbers by the photos will change color from blue to green.
Tap a numbered photo cluster, select “Edit”, and you will be able to deselect photos individually or “Deselect All”. After deselecting, hit “Done” then “Confirm”.
NOTE: Removing this location data is permanent, and any intentional geotags will be removed in the process, too.
9. Add a bio url
So far, we’ve shared a few hacks on how to remove things from your profile.
Let’s add something, shall we?
As you may have discovered, Instagram bans clickable URLs anywhere in your content except for the singular website section of your bio. Putting a URL in your captions simply won’t create a hyperlink, so your followers are then forced to copy and paste it into a web browser.
To get around this restriction, consider using captions to lead users to your overall profile (and in turn the website link in your bio).
Change this bio URL often if you’re trying to promote multiples pages from your site or other company social media accounts.

10. Explore anywhere in the world
Although the photo map can be a little revealing, you’ve got to admit that location data can be useful.
If you’d like to find photos from a specific location, hit the magnifying glass icon at the bottom of the home page. Click in the search bar, select the “Places” tab, type in the desired location, and hit “Search”.
This will show all posts that users have geotagged with that location.
NOTE: When looking at a single geotagged photo, clicking that geotag will retrieve search results for that location, too.

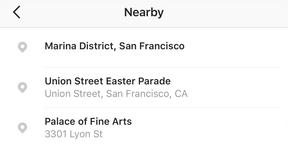
11. Explore places near you
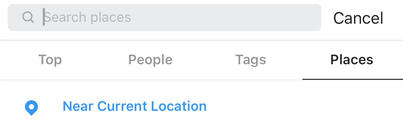
You can also find photos near your current location.
Just select the magnifying glass icon at the bottom of the home screen, click in the search bar, and select “Near Current Location”. A list of local geotags will appear to choose from.
12. View all the activity from the people you’re following
In order to see posts the people you’re following have recently interacted with, simply click the heart at the bottom of the home page, then “Following” from the series of tabs at the top.
This could help evaluate what your audience’s current Instagram habits are, giving clues as to how you can catch their engagement, too.
13. Opt out of ad tracking
Instagram monitors your activity on the app, using an algorithm to choose sponsored ads which are supposed to be “important” to you.
Are they irrelevant though?
Or, perhaps you would rather see all possible ads your audience may also be viewing in order to evaluate your competition. It’s actually possible to opt out of ad tracking on your device.
For iOS systems, go to “Settings” – “Privacy” – “Advertising” – “Limit Ad Tracking”.
On an Android, go to “Google Settings – “Ads” – “Turn Off Interest-Based Ads”.
14. Find the “Return” key for better formatting
Can’t find the enter/return key to add line breaks to your captions?
Click the “123” key in the left bottom corner of the keyboard, the “Return” key will then be in the right bottom corner.
Remember, Instagram will only show a max of 3 lines from a caption, after that the user needs to click “More.”
NOTE: Utilize this 3 line maximum to hide hashtags and keep your captions clean! Hit “Return” 3 times, then type your cluster of hashtags. The caption will simply read as […].

15. Send your photo privately
Did you know you can send photos privately on Instagram?
For your originals, first upload the picture, begin editing it, and on the “Share To” screen select “Direct” at the top. Then, just choose the recipient and hit “Send”.
This will begin a private conversation with that user. You can always view these private messages by clicking the mailbox icon at the top right of the home screen.
16. Share photos privately from other accounts
To privately share photos from other public accounts, open the post, and select the curved arrow icon near the likes and comments section.
Select who to send it to, add an optional message, and hit “Send”.
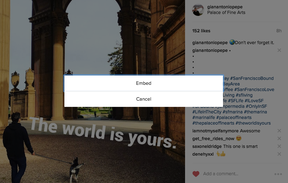
17. Embed your Instagram photos to a website
Want to share your latest Insta to your blog or website?
Go to the photo you want to share in Instagram’s web browser, click the three dot symbol, and choose Embed.
Copy and paste the html code shown to your website and voila!
18. Send a direct message
Go to your Insta homepage and click the icon in the upper right (it looks like a weird drawer).
This will take you to the Direct menu where you will see direct messages to and from other Instagram users.
This messaging function lets you send text, photos, or videos directly to any Instagram user (as long as they’re public).
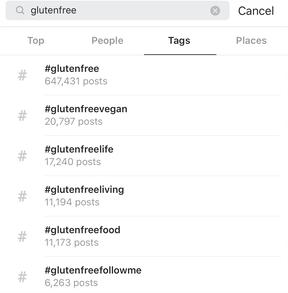
19. View the most popular hashtags
We’ve set it time and time again: #hashtags are a major key!
Choose the right ones, get enough likes, and you just might start trending.This will allow your content to get discovered by Instagram users across the world.
When you type a hashtag such as #glutenfree, Instagram will show you the most popular similar hashtags as well as how many posts there are for each.
Who knew that #glutenfreefollow me was a thing?
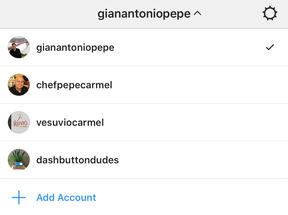
20. Manage multiple accounts
As of February 2016 you can add multiple accounts to your Instagram, meaning you no longer have to sign out every time you want to post a new picture on your dogs account.
Woof woof!
To add additional accounts, go to your profile page, click your username at the top, then click “+ Add Account”. Enter the username and password of the new account and it will be added to yours.
You can toggle between accounts by clicking the username at the top of your profile page.
Instagram used to only let you add five accounts, but some people have reported being able to add more.
If you do this be careful! You wouldn’t want to mix up which accounts you’re commenting from!
To quickly see which account you’re currently working with, check the circular button in the bottom right to make sure the profile picture is correct. Phew!
21. Add a border to your photo
The Instagram of old was chock full of bordered photos, but lately it seems as if they’re nowhere to be found.
That’s because over the years Instagram has favored borderless photos and made it harder to find the add a border feature. Do not sit idly by! Break the mold with a brazen border.
Just upload a photo as you normally would, click next, choose a filter, then tap the filter again. On the right hand side of the intensity slider you will see the Border icon. Boom!
22. Go Private
By default Instagram accounts are public.
If you want to fly under the radar, go to your profile, then tap settings and toggle the Private Account settings. Mischief managed.
23. Link your Twitter, Facebook, Tumblr, or Flickr Accounts
Maximize your social media exposure and share your photos across multiple platforms.
Go to Profile > Linked Accounts > Share Settings to select the accounts you want to connect. When you upload your next photo, you’ll be given to also share it cross-platform.
Not everything you post on Instagram feels right on Facebook or Twitter, so we here at Jumper Media suggest that you use this feature with discretion and check the post on the other platforms to make sure it is formatted correctly.
24. Add Links to Instagram Stories
New for Summer 2017, Instagram now allows you to include links in your Instagram Stories, but only if your account meets the following criteria:
- You must have an Instagram Business account
- Your account must have over 10,000 followers
Or,
- A verified account (with a blue checkmark next to your name)
If you do qualify, this is HUGE. That’s because it is really difficult to drive any meaningful amount of web traffic from your Instagram page using only the link in your bio.
But now that you can use Instagram Stories to link to your website, the possibilities are endless.
Brands that qualify have already started taking advantage of this, and some are getting swipe through rates as high as 25%, which is just insane.
25. Like Instagram Comments
Another feature added in 2017 is the ability to like comments, not just pictures. You’ve been able to do this on Facebook since pretty much forever, but this was new for Instagram, and while it’s not life changing, it definitely useful to know how to do.
Here’s how you like a comment on Instagram:
- Open the app.
- Navigate to a post with at least one comment
- Tap “View all comments.”
- Tap the heart next to the comment.
Voila!
Liking comments can be a great way to engage with your fans and drive more people to your page. How does this work?
27. Target Instagram Followers with Facebook Ads
This one is a personal favorite of mine that I’d been waiting for for a long time. (This is another one that is ONLY for Instagram Business accounts.)
If you are already using Facebook ads to market your business, then I definitely recommend checking out this article that walks you through the exact steps of how to target your Instagram followers with Facebook Ads.
At Jumper Media we tried this, but unfortunately the results weren’t stellar compared to other audiences we were using. Nevertheless it is totally worth experimenting with.
If you liked this post, pass it along! Show your friends how social media savvy you are by pressing share below.
It would really mean a lot to us.
Need help managing your company’s Instagram,
getting more followers,
creating awesome social videos, or
optimizing Facebook Ads?
You’ve come to the right place.
Get in touch for a free demo.